Sunday, December 3, 2017

How to Perform (Deleted/Lost) MXF File Recovery

MXF is abbreviation of Material Exchange Format. MXF files are generally considered to be a "container" file format, which means that the MXF file format has nothing to do with the format of the content data. There are several cases when you need to perform MXF file recovery:

Case One: Accidentally deleted MXF files on computer and emptied the recycle bin.
Case Two: MXF files got lost on SD card, USB flash drive, external hard drive, digital camera, camcorder, etc.
Case Three: Formatted storage device, with resulting loss to all existing MXF files.
Case Four: Device was attacked via virus or became corrupted.

If you made the above mistakes or faced with similar trouble, keep calm, MXF recovery software is easily accessed to recover deleted MXF videos. But at the same time, you should be aware of malware and spyware.

MXF File Recovery Software
RePicvid Free Photo Recovery could be used as MXF file recovery software to restore MXF video files. In fact, it also supports other video formats, like MP4, MPG/MPEG, MKV, AVI, WMV, MTS/M2TS and so on. It also recovers photos (free) and audio files lost for different reasons. This software is 100% safe, trustworthy and reliable.

Three Easy Steps to Recover MXF Files
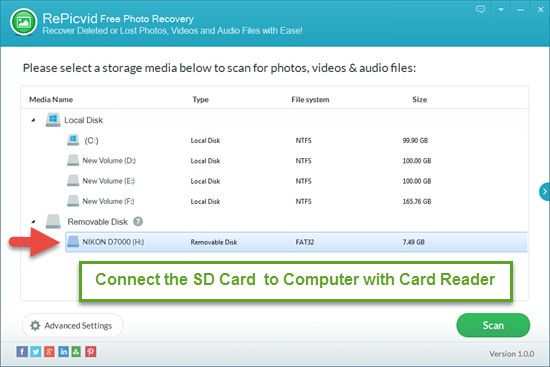
1.Run RePicvid MXF File Recovery , choose “Video/DV” and the disk where deleted MXF files are.
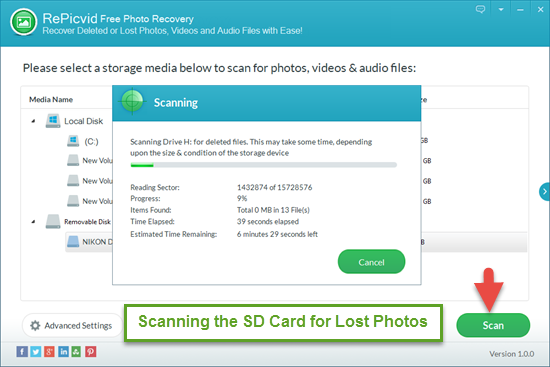
2.Select MXF format in “Advanced Settings” and click “Scan” to search for lost/deleted MXF files.
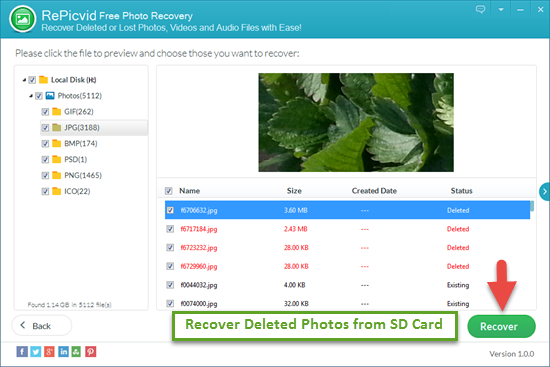
3.Preview and recover deleted MXF videos and save them onto another disk.


What if recovered MXF files can’t be open or played? According to the error, you can try the following ways to solve this problem.
1.Try different video player, such as VLC, DivX, Media Player Classic etc.
2.Change the video extension and play again
3.If the recovered video get corrupted, you may try Stellar Phoenix Video Repair
4.It could be a recovery failure, scan again or use other file recovery software.

Wednesday, November 8, 2017

SD Card Recovery for Android Phone

Normally, the internal storage space of mobile phones that support memory extension, such as Samsung, Huawei, Xiaomi, ZTE etc is very limited. So we tend to choose to store images, video and other data in SD card. But an increasing number of Android phones do not support memory cards now. There are several reasons for this trend.

1.As the early memory chips are expensive, the cost of phone with a built-in storage card will be high. When chips get cheaper, android doesn't rely on memory cards anymore. So now many android phones don't support memory extension.

2.Incorrect use and damage of memory card can easily result in data loss. Because the SD card is usually inserted directly into the cell phone, if the card is not installed tightly enough, the phone will be lost with system for poor contact or being pulled out.

3.Because of the hardware itself, the memory card can't always wake it up, otherwise it will affect service life. Many of the cheaper memory cards on the market use cheap memory chips, which are not only slow but also get corrupted with too much data.

Recover Deleted Files from Android Internal Storage
In this instance, to gain access to the data in phone’s internal storage, you need to root your mobile first. However, a lot of people are stumped in this process. Some phones can be easily rooted by software, but the others are complicated. After the root, this Android Recovery Software would help you to recover deleted files from phone internal storage.

Recover Deleted Files from SD Card in Android Phone
If you store files in a SD card, then it could easy to conduct SD card recovery for Android phone. Download the SD card recovery software to your computer. Connect the phone to computer with USB, or you can remove the SD card and insert it to a card reader to connect to computer. Then refer to the steps about how to recover deleted photos from SD card.


Monday, September 25, 2017

Easy Way to Recover Deleted/Lost Audio Files

Let us take an instance that you accidentally delete audio files on your Android phone’s memory card, digital voice recorder or computer. If you want to conduct audio recovery, what would you do first? Google and search solutions? Which software do you think is the most reliable? The free and well-known Recuva is highly recommended to recover deleted audio files, but there are still a lot of shortcomings in use:
1.Only supports Windows system.
2.Can’t scan for files selectively based on formats.
3.The scan results are not classified, and you have to preview them one by one to check what you lost.
4.Can’t preview deleted/lost audio files.


If the above affect you to recover files, there is an alternative but chargeable audio recovery software. RePicvid Free Photo Recovery Software is featured in recovering lost pictures for free on Windows or Mac computer. Besides that, you could also use it to recover video and audio files, whether they are deleted by mistake or formatted. Since it allows previewing audio files before recovery, you could check if the files you want to recover are in good condition before payment.

Warning: try not to save anything to the original place where you lost the audio files and start the recovery process as soon as possible.

Recover Deleted/Lost Audio Files with RePicvid Audio Recovery Software
1.Download and install RePicvid Free Photo Recovery Software. Launch it and select “Audio/Music” option for audio file recovery.
2.Select a file location where the lost audio files are and click Scan button.(you could pick specific audio formats in Advanced Settings if needed)
3.After the search is complete, you will see a list of the files RePicvid has found. Simply check the files you would like to recover and click Recover button.
4.Select a location for recovery and it will recover all deleted or lost audio files in minutes.


The software-supported audio formats have WMA, MP3, WAV, MID, CDA, RA, OGG, APE, FLAC, AAC, AIF, MOD, SF, VQF, M4A, etc.


Tuesday, August 22, 2017

Olympus File Recovery- Recover Deleted Pictures and Videos from Olympus Camera

Although Olympus doesn’t have the reputation as Canon and Nikon, it is still loved by consumers because of its powerful photographic function, But if you deleted or lost photos/videos stored in your Olympus camera without a backup, what would you do to recover the deleted/lost photos and videos? Professional Olympus file recovery software would solve the problems for you.

RePicvid Olympus photo recovery is free to restore photos, but you need to pay to recover deleted videos from Olympus digital camera. As long as your Olympus camera memory card can be recognized on computer, you may remove the memory card from camera and connect it to computer with a card reader, or use an USB cable to connect Olympus camera(with memory card inside) to computer (Some cameras need to install the driver). Download Olympus file recovery software and follow the steps below to recover deleted photos/videos from Olympus camera.

Recover Pictures/Videos from Olympus Camera with Olympus File Recovery Software
Step 1. Select separate “Photo/Graphic” or “All File Types” option for Olympus photo/file recovery.
Step 2. Select the Olympus camera or its memory card where lost pictures/videos are stored, then click “Scan” to start a deep scan for all photos or videos. After that, preview the lost pictures and videos.
Step 3. Choose the pictures and videos you need. Click on “Recover” to restore deleted photos/videos from Olympus camera and save them to a folder on desktop.


Reference: Free Canon Photo Recovery: Recover Deleted Photos/Videos from Canon Camera

Note: 1. After deleting or losing pictures in Olympus camera, you should stop to use it to take photos. Because once the lost pictures were overwritten by new photos, Olympus file/photo recovery can be quite difficult.
2.You can choose ORF or JPG(JPEG) photo format for the lost pictures in Olympus camera based on the particular case.

Monday, July 24, 2017

How to Recover Formatted Canon Camera Memory Card

Suppose you went out to take photos with your Canon camera, but formatted the memory card accidentally when you want to change the set up of photography. It was really the end of world, as all of you photography works and family photos are in the camera. At this point, I would recommend RePicvid I have ever used to you. After giving it a try, surprisingly, it restored all of my lost pictures successfully. Here is what i did with RePicvid to recover formatted Canon camera memory card:
First and foremost, stop taking photos with your Canon camera and take out the memory card as soon as possible. Then Download and install the software to your PC or laptop. There are two versions for Windows and Mac users, and it supports operating system from Windows XP to 10/Mac OS X v10.6 or later. After that, if your computer has a built-in reader, directly insert the memory card to its USB port. Or connect the card to computer with a card reader. You should make sure the card is recognized well on your computer, then start the software and follow steps below for free Canon photo recovery.

Step 1. Select a Recovery Option For File Type
If you only recover photos, choose free “Photo/Graphic”. Or you could try paid “All File Type” for images, videos and audio files. I’m just going to introduce free photo recovery here.


Step 2. Select Storage Media For Recovery
When connecting card to computer, it will show on the software. Click on it and then pick image format in “Advanced Settings” for JPG or CRW (canon raw pictures).


Step 3. Scan Formatted Canon Camera Memory Card for All Photos
Click “Scan” to browse all photos in the memory card. It will remind you the process and estimated time remaining, just wait patiently for the scanning results.


Step 4. Recover Lost Photos from Formatted Canon Camera Memory Card
After scanning stops, preview all lost photos in the card and tick those you need. Then click “Recover” and select local disk of your computer to save them. When the recovering ends, all of your recovered photos will generate a folder automatically.


After getting back your lost Canon photos, back them up to social account or cloud device.
Here are other features of RePicvid:
1.It could recover deleted/formatted/corrupted photos. You could use it to solve almost data loss problem.
2.It could also recover lost videos and audio files. Lost videos in Canon camera is possible to be restored with RePicvid.
3.It supports recovery from different devices, such as computer internal hard drive, external hard drive, USB drive, SD card and so on.
4.It could recover all kinds of file format, and format selection will greatly shorten the scanning time.

Monday, July 17, 2017

Free USB Recovery Software-Retrieve Files/Photos from USB Drive

“Hi, I saved a great amount of important data on a USB flash drive, but my brother deleted it since it is his USB and he wanted to create more space. Does anyone know how to recover deleted files from a USB flash drive?”

USB drive users may be trapped when confronted with similar problem. It is all known that files deleted from USB drive won’t be found in recycle bin, but more than half don’t understand how to restore deleted files that matters. Don’t be anxious, a comprehensive and reliable USB recovery software would eliminate your worries.

How to Use Free USB Recovery Software Retrieving Files from USB Flash Drive
As a free USB recovery software to recover deleted photos/pictures, RePicvid also supports videos and audio files recovery. If you find crucial files was deleted, just stop using the USB drive and insert it to computer. Then follow the guide below to recover deleted files right away.

Step 1. Download and Install Free USB Recovery Software
Free download RePicvid USB Recovery software for Windows or Mac, and install it according to the wizard.

Step 2. Choose File Type and USB Flash Drive
After installation, the software will open automatically. Select free “Photo/Graphic” or “All File Types” for recovery, and the USB flash drive that stores deleted files.


Step 3. Scan and Preview Deleted Files/Photos in USB Drive
You can choose file format in “Advanced Settings”, next click “Scan” to look through all files in the USB drive. When the scanning ends, preview files showing deleted status.


Step 4. Recover Deleted Files/Photos from USB Drive
Check deleted files that you want and click “Recover” to restore them from the USB drive. Finally, save recovered files to local disk or another external storage device.


It is particularly noteworthy that RePicvid could also recover file from USB drive due to accidental or prompt formatting, file directory damage and re-partition, etc.

Monday, July 10, 2017

Free Memory Card Recovery Software- Recover Deleted or Formatted Photos

Assuming that you organize a birthday or family party and take a lot of pictures. But you delete all photos in the camera unknowingly. Perhaps you format the memory card wrongly. At this time, the main thing is stopping using the camera again and take action as soon as possible. First remove the memory card from camera and connect it to your computer with a card reader. Then download a free photo recovery software to help you restore deleted or formatted pictures from memory card.


Best Free Memory Card Recovery Software to Recover Deleted Pictures
Valid memory card recovery software contributes to recovering more complete images successfully. RePicvid Free Photo Recovery emerges as a leader in data recovery field. It offers free recovery for deleted or formatted images. Meanwhile, it supports recovering videos and audio files from memory card of different brands like Samsung, Intel, Kingston, Transcend and so on. Common devices that use memory card are digital camera, MP4, cell phone, camcorder, video game consoles, etc. Here’s how to use free memory card recovery software. Referring to following instruction.

Step 1. Select Memory Card for Photo Recovery
Start up the software and choose "Photo/Graphic" recovery type. Bear in mind this software also offers option for recovery about videos and audio files. Then select the disk where your memory card locate.


Step 2. Scan & Preview Deleted Photos in Memory Card
Click on "Scan" to browse all photos in memory card and preview them after scanning.


Step 3. Recover Deleted Photos from Memory Card
Pick the deleted photos that you want to recover and save them to another accessible place like desktop or specific picture folder. Finally, check recovered photos and back them up.


RePicvid supports recovery from all sorts of memory card like SD card, multimedia card, memory stick, etc. You could conduct memory card recovery only in the case when the deleted photos are not covered.

Monday, July 3, 2017

Can Files be Recovered After Formatting SSD?

Do you know the theory of SSD file recovery? To put it simply, when file is lost due to SSD damage, system fails or mistaken deletion. the relevant space will be marked as “unused” area and files in SSD becomes invisible, unreadable or lost. SSD recovery software is to read and restore them with special means until they are overwritten after saving new files. For SSD users, you may want to know whether it is possible to recover files after formatting SSD. The answer is yes. Read on and learn the way.

How to Recover Files after Formatting SSD
SSD can’t be opened and prompt unformatted? If there is no important files, try chkdsk to fix it.
1.Click start button and enter cmd in the search box.
2.Right click cmd.exe and select “run as administrator”.
3.Input chkdsk h:/f (h stands for solid state disk) and press Enter.

Otherwise you need to extract vital files. RePicvid Free Photo Recovery is one of the best SSD recovery software to recover files from dead/failed/formatted SSD. Besides device damage, it also supports the occasion of wrong deletion and system corruption. And the bests thing is photo recovery is completely free. Follow next guide to recover files after formatting SSD.

Step 1. Select SSD Where Your Files Are
Choose "All File Types" and SSD where the vital files are. Then click "Advanced Settings" to select format of files.

Step 2. Scan &Preview Files in SSD
Start scanning all files in SSD. After that, preview them.


Step 3. Recover Files from Formatted SSD
Tick those files you need and click "Recover". Choose another drive to save recovered files.


Note: If you can’t open the recovered files, choose other way to view them.

What Is TRIM Command of SSD and How to Open/Close It
When it comes to SSD, you’ll often see the term “TRIM”. Unlike HDD, if you delete files in SSD that supports TRIM instruction, it will fetch a new TRIM command and perform deletion when there is another write operation. The relevant area is available and it won’t take time to wipe the original files. Thus TRIM command of SSD improves read-write efficiency greatly and reduces the loss of SSD.

Check if the TRIM command of your computer is open:
1.Click start menu and enter cmd. Right click cmd.exe and select “run as administrator”.
2.Input “fsutil behavior query DisableDeleteNotify”.
If returned value is 0, TRIM command is open.
If returned value is 1, TRIM command is close. Type fsutil behavior query DisableDeleteNotify 0 and press Enter to enable SSD TRIM support in your computer.

Sunday, July 2, 2017

Recycle Bin Recovery-How to Restore Photos Deleted from Recycle Bin for Free

Every now and then, we would clear up photos in our PC or laptop for high capacity and fast speed. But we may find there are something in need after deletion. It is much convenient to restore deleted photos from recycle bin. You just need to select what you want in recycle bin and right click to restore them or drag them to desktop. It is almost becoming common sense. However, you might also delete photos in recycle bin or even empty recycle bin when it is full. There is a way to help you recover deleted photos from recycle bin for free.

Steps to Recover Photos Deleted from Recycle Bin with RePicvid Free Photo Recovery
As far as I know, there are several free software to recover deleted photos. RePicvid Free Photo Recovery is one of the up-rising stars. It is with more friendly user-interface. Even if you are not familiar with photo recovery or recycle bin recovery, it could make you do it successfully. And it also offer to recover videos and audio files if you need to. Besides accidental deletion, it could restore photos on account of formatting, corruption and virus attack. Most importantly, it is totally free to recover photos. Referring to next tutorial to start a trip of photo recovery.

Note: Stop saving or transferring new photos or other files to your computer. Once they overwrite deleted photos, it would never be possible to restore them.

Step 1. Download and Install RePicvid Free Photo Recovery. Then launch it and select "Photo/Graphic" recovery.

Step 2. Choose local disk where your deleted photo are. If they are in different disk, just try several times to scan. Then click "Advanced Settings" to select format of photos if you need to fasten the scanning.

Step 3. Click "Scan" and wait patiently for the results. You could look through all photos in the preview window and choose what you need to recover. Lastly, save them to another disk or a portable storage device.

Generally, your deleted photos would be restored. There are also other free software to recover deleted photos, such as Recuva and PhotoRec. You could try and compare with them if there is any problem with the recovery process.

Tuesday, June 20, 2017

Laptop Recovery Software - Recover Permanently Deleted Files from Laptop

Laptop, also known as notebook, is of great portability and connectivity compared with desktop. But you may find files lost because of accidental deletion, formatting, or virus attack. One easy way to recover deleted files is through recycle bin. But if you empty recycle bin and delete files permanently, don’t be anxious, there are other solutions to settle this matter.

Recover Permanently Deleted Files from Laptop Without Software
When you find files are deleted, try some methods without software first on condition that you have created a backup before. You could do one of the two selections:
1.Search the folder or hard drive where you deleted files, and right click it.
2.Choose Restore Previous Versions.
If there is no earlier version, try next method.
1. Click Start menu and open Control Panel. Select System > System protection;
2. Choose the hard disk where deleted files located, and click Configure. Then tick the selection Restore system settings and previous versions of files, and click OK.

Using Laptop Recovery Software to Recover Permanently Deleted Files from Laptop
If next two methods don’t work, you may choose a laptop recovery software to recover deleted files. RePicvid Free Photo Recovery Software would be a lifesaver for you. It has four modules for recovery:" Photo/Graphic" (completely free), "Video/CD", "Audio/Music", "All File Types". You could select format of file and recover files from different storage devices. Just follow the easy steps to start recovering:
Step 1. Select "All File Types" and the hard drive where deleted files are located.
Step 2. Click "Advanced Settings" to choose specific format of files, which will reduce the scanning time. Then press "Scan".
Step 3. After scanning, you may preview deleted files one by one, and choose those you need to recover. Then save them to another disk.


Video demo for laptop recovery:


Methods to Reset Laptop to Factory Settings
After getting deleted files back, you need to back them up to external hard drive. There may be other problem for long-used laptop, such as slowness, crash, blue screen, etc. It would need to be reset to factory settings. Click ghost and restart laptop (note the installed software and files on desktop will disappear after ghost). If your laptop doesn’t have ghost, you could try next method:
1.Boot your laptop and click Delete, Then it will come to Bios automatically.
2.In the right panel, select Load Optimized Default with arrow keys and press Enter.
It will remind you to click Y to confirm again. Click Save&exit Step or F10 to save previous steps.

Wednesday, June 7, 2017

How to Recover Files from Formatted Pen Drive

You might come across this situation that when you unplug pen drive into computer, it pops out a windows showing: “You need to format the drive before you can use it. Do you want to format it?” Or you may accidentally format pen drive and lose all files. This is really a disaster if important files are saved there. Don’t be afraid. Here are methods on how to recover files from formatted pen drive, whether it is forcible or accidental. You may try some easy and basic solutions first:
1.Reboot your computer.
2.Safely unplug pen drive and insert it to other USB port.
3.Plug pen drive to other computer.
4.Check pen drive with anti-virus software.
If these solutions don’t work, you may attempt next two methods to recover files from formatted pen drive.

Method One: Recover Formatted Files Using CMD Command
Don’t format pen drive if it asks, and check the disk using CMD command
1.Click Start menu in the left bottom of your computer.
2.Choose “Operation”. Enter “chkdsk G:/f”. (G is the name of your pen drive)
3.Press Enter and wait for the scanning results.
If it still doesn’t work out the problem, then you can only format pen drive and try method two.
Note: chkdsk G:/f is not available for RAW files. You need to check file system of pen drive in disk management first.


Method Two: Recover Files from Formatted Pen Drive with Software
RePicvid free photo recovery is one of the best file recovery software to recover formatted pen drive, including mandatory and unexpected formatting. The biggest advantage of this program is friendly user-interface, and easy to use for those without any technical knowledge. And it could restore formatted/deleted/lost pictures, videos and audio files from various storage devices, such as computer, USB flash drive, hard drive, SD card, etc. Follow next tutorial on detailed steps of pen drive recovery procedures.

Step 1. Download and Install RePicvid Free Photo Recovery
Downloading for Windows and Mac is approachable. After that, install RePicvid according to the hints.

Step 2. Start RePicvid and Select All File Types
Double click the icon of RePicvid. There are four options of recovery for choosing. Select "All File Types".


Step 3. Scan Pen Drive for Formatted Files
For fast scanning, you may choose specific format of files. Or just skip this function if you don’t know the exact format. Click “Scan” to start looking for all files in your pen drive, and keep patient cause the scanning may take some time depending on the size and condition of pen drive. Afterwards, you can select formatted files to preview.


Step 4. Recover and Save Files from Formatted Pen Drive
You could recover particular files after previewing. Then save them to desktop or a special folder. Remember not to save them to your pen drive again.


How to Recover Deleted Files from Pen Drive

Friday, May 12, 2017

Free SD Card Recovery Software- Recover Deleted Photos from SD Card

SD Card is used widely in our daily life to expand capacity of storage device, such as Android phone, digital camera, etc. However, there is great possibility that photos are lost in some situations, such as accidental deletion, or formatting SD card by wrong operation. It is really upsetting for this problem and lost pictures even can't be found in recycle bin. Therefore, RePicvid Free Photo Recovery, a reliable SD card recovery software, is introduced to help you recover deleted or formatted pictures from SD card, as well as videos and music. It is professional and safe to restore photos from other common devices, and completely free for the whole SD card photo recovery process. You can preview results before recovering, besides it provides choosing formats of pictures for fast scanning.

Deleted photos can be restored with RePicvid because deleting operation makes location of original pictures inaccessible but not deletes contents for good. The software is able to undelete the invisible pictures if they are not overwritten by new records. So stop writing to SD card when you find pictures are deleted or lost. Then download free SD card recovery software and begin to restore photos from SD card.

Three Steps to Conduct SD Card Photo Recovery with Free SD Card Recovery Software
Step 1. Install RePicvid free photo recovery and start it up; Connect SD card to computer with card reader. And then choose photo/graphic mode; Select a storage disk represented by the SD card.

Step 2. Start to scan SD card for lost pictures; Click "Advanced Settings" to select formats of photos like jpg, png, gif, etc.

Step 3When scanning is completed, preview images and choose what you want to recover. Finally, save recovered pictures to another folder.

SD Card Recovery Software Supported Storage Devices and File Formats
Digital camera, Digital camcorder, Personal digital assistant, Mobile phone, Multimedia player etc.
  • Image: GIF, JPG, BMP, TIF, JPEG, TGA, EXIF, etc.
  • Video: MOV, MKV, AVI, MPEG, M2TS, MP4, etc.
  • Audio: MP3, WAV, MID, AAC, AIF, etc.
Suggestions for SD Card Photo Recovery
1. Stop saving new pictures and videos to SD card if you want to retrieve deleted photos successfully. Once they are overwritten, you will never get them back.
2. Classify and clear up pictures regularly, thus it will help you avoid lost photos caused by accidental deletion.
3. Know more about SD card photo recovery, then choose a reliable SD card recovery software to restore deleted/formatted images.